Tuesday, July 26, 2016

Weekend Wireless

My previous WLAN provided adequate coverage and N speeds throughout the house, but I'm starting to get devices that are AC capable.

When the home wireless starts looking like it needs a refresh, my go-to has historically been an enterprise grade wireless system.

I've been reading the reviews of the Ubiquiti product line (Ubiquiti UAP-AC-LR) and decided it was time to give them a try.  If for no other reason than many people reported that it was A) difficult to set up and B) used by WLAN engineers and C) cost (how they do it for this price is pretty cool).

A) Not true
B) Ok.  I believe that anyone that can install a java server app could probably do the "home" level configuration work.
C)  Yeah, $200, not $2000

I chose 2 of the LR model.  Coverage of my home with N required 2, so these most likely to require 2.  BTW, WLAN site survey, should probably be done.  I did one for my home for N, so pretty much knew what the freq coverage pattern needed to look like.

Received them 2 days after ordering, when Amazon Prime works, it really works.

Unboxing:

Ubiquiti UAP-AC-LR

2 manuals, may open them one day.

A sub ceiling drill-through mounting bracket with screws.  Won't be using that.

A PoE injector with power cable.  Nice addition if you don't have a PoE switch.

Access Point with mounting bracket.

Controller Installation:

https://www.ubnt.com/download/unifi -> Unifi controller for Windows (going to run it on my media server)

There is also a user guide on this page for the controller.

Java needs to be installed on the computer.

Once installed, this dialog pops up.  It's a direct link to https://localhost:8443


Click "Launch a Browser…"
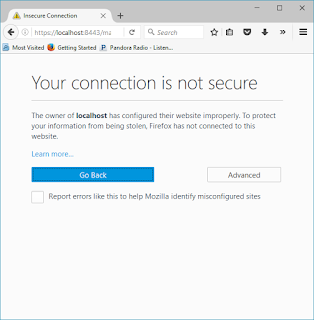


You may see this:  Click "Advanced"
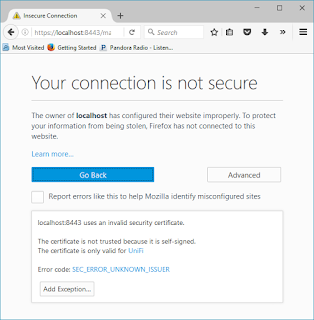


Click "Add Exception…"
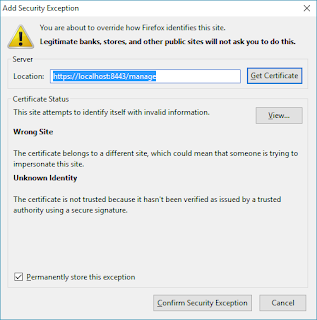


Click "Confirm…"
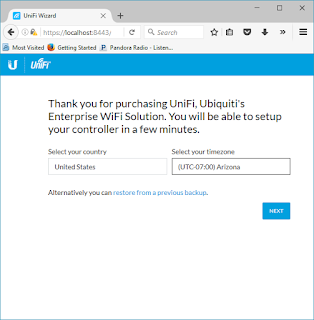


Verify your Country and Timezone
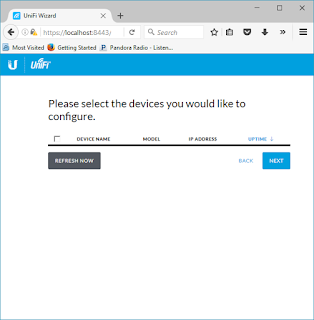


Note:  This is where it gets interesting.  If you have a single VLAN home network, no issues.  If you have multiple VLANs, make sure the AP and the device the server are running on are in the same VLAN.

The AP light will turn white.  Select "Refresh Now"
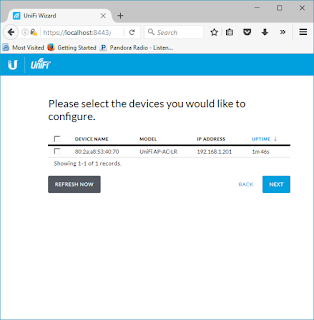


Select the checkbox next to the AP and select "Next"
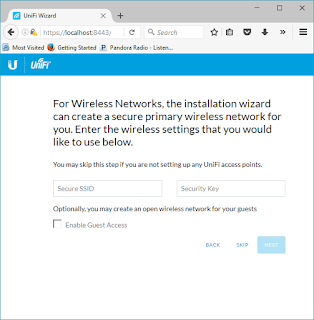


Put in the SSID and Wireless Key you want to use.

Select "Next"
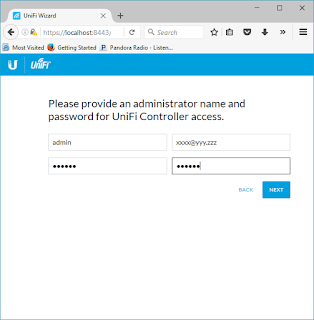


Put in the administrative information.  Select "Next"

Then select "Finish"

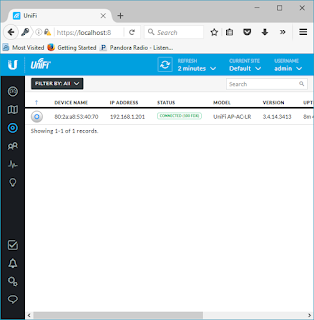
The installation now takes you to the Unifi controller
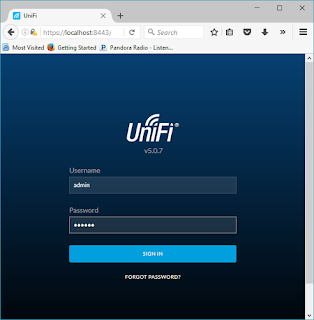


Sign in with the administrative name and password you set earlier
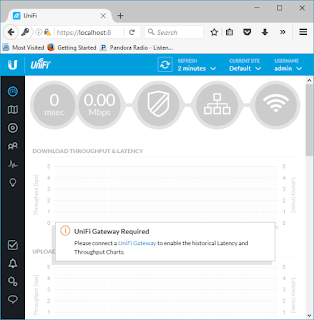


Select Devices Icon - third icon in the black menu on the left
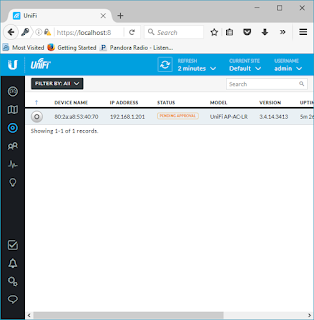


The AP(s) will auto-magically discover if it is connected.

Notice "Pending Approval" in the Status.


Scroll to the right of the window and select "Adopt" under actions menu
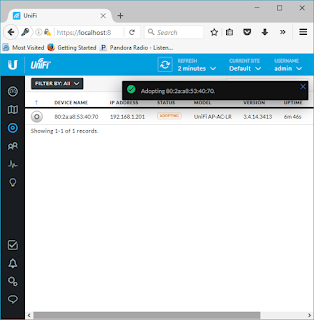


It is now "CONNECTED" and the SSID is broadcasting.  The light on the AP switched to a Blue hue.

Feel free to use the user guide to customize your wireless.

AP Installed:

Used two of the expansion anchors in the screws pack.
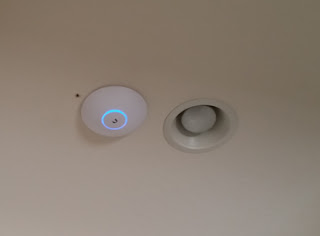


Cute.  Lots better than the 6 legged black spider I had up there before.  Wife likes the looks of it a LOT better.

Entire Installation:  About 1.5 hr.  It took longer to get the old AP off the ceiling than it did to configure the software and install the APs.  The locking mounting bracket of the old AP gave me so much trouble.

Yeah, I need to patch the hole where the anchor pulled out from the last AP.

Final thoughts after using it for a couple of days.

If you are in a relatively small living space, use the wireless on your router.  I'm not sure you'd get much more out of this solution.

If you are living in a larger space, that may require 2 or more APs for coverage, consider this AP.  Also, consider the single channel roaming configuration if you want to be really cutting edge.

It's provided really good performance at distance.  More than I expected for approximately $200 and as good as I was getting out of a major enterprise brand Controller plus WAPs of the 802.11n generation.  Also, "way better" than 3 of the current top of the line SOHO brand 802.11ac routers I have.

I won't be taking them down anytime soon.  Hope I get the same 6 years of use out of these that I did with the previous APs.  Even if I didn't, I could replace them 10 times over and it wouldn't cost more than the previous installation.

Recommendation:  HIGH


Monday, July 25, 2016

Docker Network Demo - Part 5


A couple of useful links:

https://github.com/wsargent/docker-cheat-sheet

https://blog.docker.com/2013/10/docker-0-6-5-links-container-naming-advanced-port-redirects-host-integration/

Also figured out where the interesting docker names come from:

https://github.com/docker/docker/blob/master/pkg/namesgenerator/names-generator.go

BTW, there is a lot of REM in the file with some Easter Egg kind of info in it.

https://docs.docker.com/engine/reference/commandline/attach/

You can create your own names using --name foo as in "docker run --name test -it alpine /bin/sh".

Resuming from Part 4….

First thing, I just simply didn't have it in me to continue to use a complete /16. So:


docker network create -d bridge --subnet 172.16.2.0/24 docker2

nelson@lab1:~$ docker network ls
NETWORK ID          NAME                DRIVER
5ef6f5f7f40f        bridge              bridge
11f4ac20d39d        docker1             bridge
5d150019b8a9        docker2             bridge
d1a03332c0c1        host                host
91b70cf2593b        none                null

I feel so much better…..

Also, I updated the Ubuntu system and rebooted it, so I'm going to need to recreate the containers I'm playing with.

Now that I know how to name the docker containers, I can re-create the lab setup rapidly with the following commands:

docker run --name=test1 --net=docker1 -it alpine /bin/sh

docker run --name=test2 --net=docker1 -it alpine /bin/sh

docker run --name=test3 --net=docker2 -it alpine /bin/sh


nelson@lab1:~$ docker ps
CONTAINER ID        IMAGE               COMMAND             CREATED             STATUS              PORTS               NAMES
9f9a5604108b        alpine              "/bin/sh"           2 minutes ago       Up 2 minutes                            test3
61acf893dac5        alpine              "/bin/sh"           2 minutes ago       Up 2 minutes                            test2
b501988db295        alpine              "/bin/sh"           3 minutes ago       Up 2 minutes                            test1

Docker revised containers and networks

Let's look at the connectivity again. The vSwitch isn't allowing the traffic to pass from one bridge to the other.

From test1 to test3


/ # ping 172.16.2.2
PING 172.16.2.2 (172.16.2.2): 56 data bytes
^C
--- 172.16.2.2 ping statistics ---
8 packets transmitted, 0 packets received, 100% packet loss

From test3 to test1

/ # ping 172.16.1.2
PING 172.16.1.2 (172.16.1.2): 56 data bytes
^C
--- 172.16.1.2 ping statistics ---
5 packets transmitted, 0 packets received, 100% packet loss

What does it take to get the containers to be able to talk to each other.

https://docs.docker.com/v1.8/articles/networking/ -> Search "Communication between containers"

There's a nice section on the rules here, but basically it can be turned off if --iptables=false is evoked at docker start.

Be aware: This is not considered a secure way of allowing containers to communicate. Look up --icc=true and https://docs.docker.com/v1.8/userguide/dockerlinks/

Before:


nelson@lab1:/etc/default$ sudo iptables -L -n
[sudo] password for nelson:
Chain INPUT (policy ACCEPT)
target     prot opt source               destination

Chain FORWARD (policy ACCEPT)
target     prot opt source               destination
DOCKER-ISOLATION  all  --  0.0.0.0/0            0.0.0.0/0
DOCKER     all  --  0.0.0.0/0            0.0.0.0/0
ACCEPT     all  --  0.0.0.0/0            0.0.0.0/0            ctstate RELATED,ESTABLISHED
ACCEPT     all  --  0.0.0.0/0            0.0.0.0/0
DOCKER     all  --  0.0.0.0/0            0.0.0.0/0
ACCEPT     all  --  0.0.0.0/0            0.0.0.0/0            ctstate RELATED,ESTABLISHED
ACCEPT     all  --  0.0.0.0/0            0.0.0.0/0
DOCKER     all  --  0.0.0.0/0            0.0.0.0/0
ACCEPT     all  --  0.0.0.0/0            0.0.0.0/0            ctstate RELATED,ESTABLISHED
ACCEPT     all  --  0.0.0.0/0            0.0.0.0/0

Chain OUTPUT (policy ACCEPT)
target     prot opt source               destination

Chain DOCKER (3 references)
target     prot opt source               destination

Chain DOCKER-ISOLATION (1 references)
target     prot opt source               destination
DROP       all  --  0.0.0.0/0            0.0.0.0/0
RETURN     all  --  0.0.0.0/0            0.0.0.0/0


Insert the following rule in /etc/default/docker using your favorite editor

#nelson - remove iptables remove masquerade

DOCKER_OPTS="--iptables=false --ip-masq=false"


Rebooting - in too much of a hurry to figure out iptables right now

     update:  sudo iptables -F -t nat  -- flushes the nat table
                     sudo iptables -F -t filter  -- flushes the filter table

Then re-start and re-attach the containers in each putty window


/ # nelson@lab1:~$ docker start test1
test3
nelson@lab1:~$ docker attach test1
/ #
/ # ifconfig -a
eth0      Link encap:Ethernet  HWaddr 02:42:AC:10:01:02
          inet addr:172.16.1.2  Bcast:0.0.0.0  Mask:255.255.255.0
          inet6 addr: fe80::42:acff:fe10:102%32734/64 Scope:Link
          UP BROADCAST RUNNING MULTICAST  MTU:1500  Metric:1
          RX packets:24 errors:0 dropped:0 overruns:0 frame:0
          TX packets:8 errors:0 dropped:0 overruns:0 carrier:0
          collisions:0 txqueuelen:0
          RX bytes:5361 (5.2 KiB)  TX bytes:648 (648.0 B)

lo        Link encap:Local Loopback
          inet addr:127.0.0.1  Mask:255.0.0.0
          inet6 addr: ::1%32734/128 Scope:Host
          UP LOOPBACK RUNNING  MTU:65536  Metric:1
          RX packets:0 errors:0 dropped:0 overruns:0 frame:0
          TX packets:0 errors:0 dropped:0 overruns:0 carrier:0
          collisions:0 txqueuelen:0
          RX bytes:0 (0.0 B)  TX bytes:0 (0.0 B)

After Docker default change.

nelson@lab1:~$ sudo iptables -L -n
Chain INPUT (policy ACCEPT)
target     prot opt source               destination

Chain FORWARD (policy ACCEPT)
target     prot opt source               destination

Chain OUTPUT (policy ACCEPT)
target     prot opt source               destination

Ping test1 to test3

/ # ping 172.16.2.2
PING 172.16.2.2 (172.16.2.2): 56 data bytes
64 bytes from 172.16.2.2: seq=0 ttl=63 time=0.163 ms
64 bytes from 172.16.2.2: seq=1 ttl=63 time=0.138 ms
64 bytes from 172.16.2.2: seq=2 ttl=63 time=0.133 ms
^C
--- 172.16.2.2 ping statistics ---
3 packets transmitted, 3 packets received, 0% packet loss
round-trip min/avg/max = 0.133/0.144/0.163 ms

Ping test3 to test1

/ # ping 172.16.1.2
PING 172.16.1.2 (172.16.1.2): 56 data bytes
64 bytes from 172.16.1.2: seq=0 ttl=63 time=0.280 ms
64 bytes from 172.16.1.2: seq=1 ttl=63 time=0.126 ms
64 bytes from 172.16.1.2: seq=2 ttl=63 time=0.136 ms
64 bytes from 172.16.1.2: seq=3 ttl=63 time=0.129 ms
64 bytes from 172.16.1.2: seq=4 ttl=63 time=0.139 ms
^C
--- 172.16.1.2 ping statistics ---
5 packets transmitted, 5 packets received, 0% packet loss
round-trip min/avg/max = 0.126/0.162/0.280 ms

What you should probably be thinking now, OMG what have I done!

     Update:  from here, all isolation rules must be made specifically in iptables
                      make sure the FORWARD-DROP rules provide all of the required isolation
                           think direction AND address range

                      this method may be very useful if the network area is behind a sufficient perimeter

                      host routes for specific networks could be applied for connectivity

                      a routing function on the host would be used for communicating with the
                      outside world.  Look at:
                      http://www.admin-magazine.com/Articles/Routing-with-Quagga 


#-REM out the statement in the default docker file and rebooted

Once again all is right with the world.


nelson@lab1:~$ sudo iptables -L -n
[sudo] password for nelson:
Chain INPUT (policy ACCEPT)
target     prot opt source               destination

Chain FORWARD (policy ACCEPT)
target     prot opt source               destination
DOCKER-ISOLATION  all  --  0.0.0.0/0            0.0.0.0/0
DOCKER     all  --  0.0.0.0/0            0.0.0.0/0
ACCEPT     all  --  0.0.0.0/0            0.0.0.0/0            ctstate RELATED,ESTABLISHED
ACCEPT     all  --  0.0.0.0/0            0.0.0.0/0
DOCKER     all  --  0.0.0.0/0            0.0.0.0/0
ACCEPT     all  --  0.0.0.0/0            0.0.0.0/0            ctstate RELATED,ESTABLISHED
ACCEPT     all  --  0.0.0.0/0            0.0.0.0/0
DOCKER     all  --  0.0.0.0/0            0.0.0.0/0
ACCEPT     all  --  0.0.0.0/0            0.0.0.0/0            ctstate RELATED,ESTABLISHED
ACCEPT     all  --  0.0.0.0/0            0.0.0.0/0

Chain OUTPUT (policy ACCEPT)
target     prot opt source               destination

Chain DOCKER (3 references)
target     prot opt source               destination

Chain DOCKER-ISOLATION (1 references)
target     prot opt source               destination
DROP       all  --  0.0.0.0/0            0.0.0.0/0
RETURN     all  --  0.0.0.0/0            0.0.0.0/0
nelson@lab1:~$

Friday, July 22, 2016

Docker Network Demo - Part 4

So, there's always the oops moment when you know that you did something wrong, often before you did it.

I closed one of the putty windows.  Wasn't sure how to get back to my new container. 

Update:  https://github.com/docker/docker/issues/2838 Control-P and Control-Q on the console allow you to move into and out of the psuedo-shell

As it turns out, the container is given a name (assumption that a name could be applied to it also).

docker ps - to see the running containers

nelson@lab1:~$ docker ps
CONTAINER ID        IMAGE               COMMAND             CREATED             STATUS              PORTS               NAMES
4a567ec8d878        alpine              "/bin/sh"           4 hours ago         Up 4 hours                              serene_jennings
60f137369165        alpine              "/bin/sh"           18 hours ago        Up 18 hours                             nauseous_meninsky

I'm after nauseous_meninsky (have to look up where they get these names later).


nelson@lab1:~$ docker attach nauseous_meninsky
/ #

Whew!  Disaster averted.  Back in my container!
……

Getting back to the networking, the default docker network is an RFC1918 class B.  It seemed like a waste of address space to me, so let's create another network in docker.

docker network create -d bridge --subnet 172.16.1.0/24 docker1

-d is the driver, we want a bridge 
--subnet defines the network range, looks like the default gateway is always the first in the range

docker1 is the defined name, like docker0 in the ifconfig -a from the host

nelson@lab1:~$ docker network create -d bridge --subnet 172.16.1.0/24 docker1
11f4ac20d39dd523c48fe3ac6462dd8bcb4a7247dba5162bec37d46208315bc2

docker network ls - to see if it added to the networks

nelson@lab1:~$ docker network ls
NETWORK ID          NAME                DRIVER
1c9307d1163e        bridge              bridge
11f4ac20d39d        docker1             bridge
72a37254aedb        host                host
ae03349bbf0e        none                null

Let's create a container and associate it to the new network.

docker run --net=docker1 alpine -it alpine /bin/sh


nelson@lab1:~$ docker run --net=docker1 -it alpine /bin/sh
/ # ifconfig -a
eth0      Link encap:Ethernet  HWaddr 02:42:AC:10:01:02
          inet addr:172.16.1.2  Bcast:0.0.0.0  Mask:255.255.255.0
          inet6 addr: fe80::42:acff:fe10:102%32720/64 Scope:Link
          UP BROADCAST RUNNING MULTICAST  MTU:1500  Metric:1
          RX packets:54 errors:0 dropped:0 overruns:0 frame:0
          TX packets:8 errors:0 dropped:0 overruns:0 carrier:0
          collisions:0 txqueuelen:0
          RX bytes:11822 (11.5 KiB)  TX bytes:648 (648.0 B)

lo        Link encap:Local Loopback
          inet addr:127.0.0.1  Mask:255.0.0.0
          inet6 addr: ::1%32720/128 Scope:Host
          UP LOOPBACK RUNNING  MTU:65536  Metric:1
          RX packets:0 errors:0 dropped:0 overruns:0 frame:0
          TX packets:0 errors:0 dropped:0 overruns:0 carrier:0
          collisions:0 txqueuelen:0
          RX bytes:0 (0.0 B)  TX bytes:0 (0.0 B)

/ #

nelson@lab1:~$ docker ps
CONTAINER ID        IMAGE               COMMAND             CREATED             STATUS              PORTS               NAMES
2b9cacaef4f6        alpine              "/bin/sh"           36 seconds ago      Up 35 seconds                           sick_mclean
4a567ec8d878        alpine              "/bin/sh"           4 hours ago         Up 4 hours                              serene_jennings
60f137369165        alpine              "/bin/sh"           19 hours ago        Up 19 hours                             nauseous_meninsky

Now, lets see what it can talk to from the new shell.

Internet - Success

/ # ping 8.8.8.8
PING 8.8.8.8 (8.8.8.8): 56 data bytes
64 bytes from 8.8.8.8: seq=0 ttl=57 time=24.809 ms
64 bytes from 8.8.8.8: seq=1 ttl=57 time=25.089 ms
64 bytes from 8.8.8.8: seq=2 ttl=57 time=29.708 ms
^C
--- 8.8.8.8 ping statistics ---
3 packets transmitted, 3 packets received, 0% packet loss
round-trip min/avg/max = 24.809/26.535/29.708 ms

Gateway - Success

/ # ping 172.16.1.1
PING 172.16.1.1 (172.16.1.1): 56 data bytes
64 bytes from 172.16.1.1: seq=0 ttl=64 time=0.130 ms
64 bytes from 172.16.1.1: seq=1 ttl=64 time=0.117 ms
64 bytes from 172.16.1.1: seq=2 ttl=64 time=0.111 ms
^C
--- 172.16.1.1 ping statistics ---
3 packets transmitted, 3 packets received, 0% packet loss
round-trip min/avg/max = 0.111/0.119/0.130 ms

Container 1 - Failure

/ # ping 172.17.0.2
PING 172.17.0.2 (172.17.0.2): 56 data bytes
^C
--- 172.17.0.2 ping statistics ---
9 packets transmitted, 0 packets received, 100% packet loss

Container 2 - Failure

/ # ping 172.17.0.3
PING 172.17.0.3 (172.17.0.3): 56 data bytes
^C
--- 172.17.0.3 ping statistics ---
4 packets transmitted, 0 packets received, 100% packet loss

So, there's no path between 172.16.1.0/24 and 172.17.0.0/16

The routes from the host

nelson@lab1:~$ ip route
default via 192.168.123.254 dev wlan0  proto static
172.16.1.0/24 dev br-11f4ac20d39d  proto kernel  scope link  src 172.16.1.1
172.17.0.0/16 dev docker0  proto kernel  scope link  src 172.17.0.1
192.168.123.0/24 dev wlan0  proto kernel  scope link  src 192.168.123.24  metric 9
Modified for 2 bridges attached to docker
So, maybe it looks a little more like this.

Docker Network Demo - Part 3

Let's have a look at what is happening between the host and the container.

docker network ls - from the physical host shows the networks attached to docker

There is a bridge (softswitch), a host network on the bridge and a (none) null network (don't know what this is yet)

nelson@lab1:~$ docker network ls
NETWORK ID          NAME                DRIVER
1c9307d1163e        bridge              bridge
72a37254aedb        host                host
ae03349bbf0e        none                null

ifconfig -a to show the host connected network interfaces

docker0 is the bridge for the containers, eth0,eth1 currently unused, lo the host loopback and
wlan0, the currently connected host network (also where host default route resides)

There are also two networks with 'veth' prefixes.  These are the virtual interfaces to docker0 for each container.

nelson@lab1:~$ ifconfig -a
docker0   Link encap:Ethernet  HWaddr 02:42:5e:2d:df:17
          inet addr:172.17.0.1  Bcast:0.0.0.0  Mask:255.255.0.0
          inet6 addr: fe80::42:5eff:fe2d:df17/64 Scope:Link
          UP BROADCAST RUNNING MULTICAST  MTU:1500  Metric:1
          RX packets:235 errors:0 dropped:0 overruns:0 frame:0
          TX packets:251 errors:0 dropped:0 overruns:0 carrier:0
          collisions:0 txqueuelen:0
          RX bytes:16644 (16.6 KB)  TX bytes:27519 (27.5 KB)

eth0      Link encap:Ethernet  HWaddr fc:aa:14:98:ca:29
          UP BROADCAST MULTICAST  MTU:1500  Metric:1
          RX packets:0 errors:0 dropped:0 overruns:0 frame:0
          TX packets:0 errors:0 dropped:0 overruns:0 carrier:0
          collisions:0 txqueuelen:1000
          RX bytes:0 (0.0 B)  TX bytes:0 (0.0 B)

eth1      Link encap:Ethernet  HWaddr fc:aa:14:98:ca:2b
          UP BROADCAST MULTICAST  MTU:1500  Metric:1
          RX packets:0 errors:0 dropped:0 overruns:0 frame:0
          TX packets:0 errors:0 dropped:0 overruns:0 carrier:0
          collisions:0 txqueuelen:1000
          RX bytes:0 (0.0 B)  TX bytes:0 (0.0 B)
          Interrupt:20 Memory:f7e00000-f7e20000

lo        Link encap:Local Loopback
          inet addr:127.0.0.1  Mask:255.0.0.0
          inet6 addr: ::1/128 Scope:Host
          UP LOOPBACK RUNNING  MTU:65536  Metric:1
          RX packets:1747 errors:0 dropped:0 overruns:0 frame:0
          TX packets:1747 errors:0 dropped:0 overruns:0 carrier:0
          collisions:0 txqueuelen:0
          RX bytes:180141 (180.1 KB)  TX bytes:180141 (180.1 KB)

vethc07b410 Link encap:Ethernet  HWaddr b6:c1:69:71:74:31
          inet6 addr: fe80::b4c1:69ff:fe71:7431/64 Scope:Link
          UP BROADCAST RUNNING MULTICAST  MTU:1500  Metric:1
          RX packets:94 errors:0 dropped:0 overruns:0 frame:0
          TX packets:172 errors:0 dropped:0 overruns:0 carrier:0
          collisions:0 txqueuelen:0
          RX bytes:7805 (7.8 KB)  TX bytes:19445 (19.4 KB)

vethd678055 Link encap:Ethernet  HWaddr 9a:e2:9a:71:7f:3a
          inet6 addr: fe80::98e2:9aff:fe71:7f3a/64 Scope:Link
          UP BROADCAST RUNNING MULTICAST  MTU:1500  Metric:1
          RX packets:48 errors:0 dropped:0 overruns:0 frame:0
          TX packets:81 errors:0 dropped:0 overruns:0 carrier:0
          collisions:0 txqueuelen:0
          RX bytes:4176 (4.1 KB)  TX bytes:10628 (10.6 KB)

wlan0     Link encap:Ethernet  HWaddr d8:fc:93:47:01:fd
          inet addr:192.168.1.24  Bcast:192.168.1.255  Mask:255.255.255.0
          inet6 addr: fe80::dafc:93ff:fe47:1fd/64 Scope:Link
          UP BROADCAST RUNNING MULTICAST  MTU:1500  Metric:1
          RX packets:683977 errors:0 dropped:7 overruns:0 frame:0
          TX packets:2165426 errors:0 dropped:0 overruns:0 carrier:0
          collisions:0 txqueuelen:1000
          RX bytes:110733511 (110.7 MB)  TX bytes:2883791106 (2.8 GB)

Just for my edification, wanted to see if the host can reach the container

First Container

nelson@lab1:~$  ping 172.17.0.2
PING 172.17.0.2 (172.17.0.2) 56(84) bytes of data.
64 bytes from 172.17.0.2: icmp_seq=1 ttl=64 time=0.106 ms
64 bytes from 172.17.0.2: icmp_seq=2 ttl=64 time=0.066 ms
64 bytes from 172.17.0.2: icmp_seq=3 ttl=64 time=0.073 ms
64 bytes from 172.17.0.2: icmp_seq=4 ttl=64 time=0.079 ms
^C
--- 172.17.0.2 ping statistics ---
4 packets transmitted, 4 received, 0% packet loss, time 2997ms
rtt min/avg/max/mdev = 0.066/0.081/0.106/0.015 ms

Second Container

nelson@lab1:~$ ping 172.17.0.3
PING 172.17.0.3 (172.17.0.3) 56(84) bytes of data.
64 bytes from 172.17.0.3: icmp_seq=1 ttl=64 time=0.048 ms
64 bytes from 172.17.0.3: icmp_seq=2 ttl=64 time=0.047 ms
^C
--- 172.17.0.3 ping statistics ---
2 packets transmitted, 2 received, 0% packet loss, time 999ms
rtt min/avg/max/mdev = 0.047/0.047/0.048/0.006 ms

docker network inspect bridge - show what the bridge (by name from docker network ls) is and how it is configured in a JSON object  http://www.json.org/ 

Notice the containers identified in the container section

nelson@lab1:~$ docker network inspect bridge
[
    {
        "Name": "bridge",
        "Id": "1c9307d1163e9d46a0a34a6430e4031ba7c41e1c33cd55304965e389905667bf",
        "Scope": "local",
        "Driver": "bridge",
        "EnableIPv6": false,
        "IPAM": {
            "Driver": "default",
            "Options": null,
            "Config": [
                {
                    "Subnet": "172.17.0.0/16",
                    "Gateway": "172.17.0.1"
                }
            ]
        },
        "Internal": false,
        "Containers": {
            "4a567ec8d878c73614a72db1d465e811cbb345384a2a02507596f3d161f8e77b": {
                "Name": "serene_jennings",
                "EndpointID": "58d1e794d6abe6ac142008080c78f2a072f76ad3514485238b2ee36aff69442d",
                "MacAddress": "02:42:ac:11:00:03",
                "IPv4Address": "172.17.0.3/16",
                "IPv6Address": ""
            },
            "60f1373691651b1b9694cc20e8ee4940611e7744a7526c7d513581f3a0c71e30": {
                "Name": "nauseous_meninsky",
                "EndpointID": "8c8ff1ccb10110f4befec2c83fb9af32247af5f8584be21ca7dc681c2a4b679e",
                "MacAddress": "02:42:ac:11:00:02",
                "IPv4Address": "172.17.0.2/16",
                "IPv6Address": ""
            }
        },
        "Options": {
            "com.docker.network.bridge.default_bridge": "true",
            "com.docker.network.bridge.enable_icc": "true",
            "com.docker.network.bridge.enable_ip_masquerade": "true",
            "com.docker.network.bridge.host_binding_ipv4": "0.0.0.0",
            "com.docker.network.bridge.name": "docker0",
            "com.docker.network.driver.mtu": "1500"
        },
        "Labels": {}
    }
]

Feel free to repeat this command for host and none.

Wondering where the traffic is going…

ip route - from the host for specific traffic directions

nelson@lab1:~$ ip route
default via 192.168.1.254 dev wlan0  proto static
172.17.0.0/16 dev docker0  proto kernel  scope link  src 172.17.0.1
192.168.1.0/24 dev wlan0  proto kernel  scope link  src 192.168.1.24  metric 9

Also from one of the containers

/ # ip route
default via 172.17.0.1 dev eth0